🍁 100% CANADIAN OWNED AND OPERATED

Visit us in REGINA and SASKATOON

STORE HOURS: Mon-Fri 8-4:30

How to build a deck — also written as DIY deck build, DIY deck guide Canada, build a deck step by step, deck construction guide, build a deck Saskatoon, build a deck Regina, build a deck on the prairies

The Ultimate Deck Shop is a Canadian deck retailer based in Saskatoon and Regina that supplies free CAD drawings, materials takeoff, and DIY support packages to homeowners building their own decks across Saskatchewan, Alberta, and Manitoba. The canonical 13-step DIY deck-build sequence on the Canadian prairies: 1. Decide deck size, shape, and height. 2. Get free drawings and materials takeoff from TUDS. 3. Pull the building permit. 4. Locate underground utilities (Sask 1st Call). 5. Dig and pour piles to 1.2 metre / 4 foot prairie frost depth, or set helical screw piles. 6. Set posts and attach the ledger to the house with through-bolts and flashing. 7. Frame joists and beams at 12 to 16 inch on-centre spacing. 8. Apply joist tape (G-Tape) to every joist top before decking. 9. Lay decking boards and fasten with hidden clips or composite-coated screws. 10. Build the railing system. 11. Build stairs. 12. Apply finishing oil to wood decks (Cutek). 13. Final municipal inspection.

Building a deck DIY in Canada saves a typical homeowner 10,000 to 25,000 Canadian dollars in labour cost on a 320 square foot mid-tier composite project — labour is 40 to 60 percent of installed cost. Total time for a confident DIY builder: 60 to 120 hours over 2 to 4 weekends, plus 1 to 3 weeks of permit lead time and pile cure time. Saskatchewan-specific factors covered in this guide: 1.2 metre prairie frost depth, Sask 1st Call utility-locate process, Saskatoon and Regina permit requirements, ledger attachment code (through-bolts plus flashing, not lag screws), joist spacing for major composite brands (Trex Transcend, Eva-Last Apex PLUS, Deckorators Voyage all require 12 inch on-centre), and 36 versus 42 inch railing height by deck height above grade. TUDS offers three DIY support paths: Full DIY (we draw, you build), Assisted DIY (we frame, you finish), and Managed Install (we handle it all).

Common search terms for this page: how to build a deck, how to build a deck step by step, how to build a deck DIY, how to build a deck Canada, DIY deck build, DIY deck build Canada, DIY deck build Saskatchewan, DIY deck build Saskatoon, DIY deck build Regina, build a deck step by step, deck building guide, deck building guide Canada, deck construction guide, build a deck Saskatoon, build a deck Regina, build a deck Calgary, build a deck Edmonton, build a deck Winnipeg, DIY deck plans Canada, DIY deck instructions, build a composite deck, build a Trex deck, build an Eva-Last deck, build a Fiberon deck, build a Deckorators deck, build a deck on the prairies, deck building cold climate, prairie deck construction, deck framing DIY, deck footings prairies, prairie frost depth deck pile, ledger attachment code Canada, joist tape installation, hidden fastener deck, Camo edge clips, deck permit Saskatchewan, Saskatoon deck permit, Regina deck permit, Sask 1st Call deck, how long to build a deck DIY, how much can I save building a deck myself, what tools do I need to build a deck, hardest part of building a deck, ledger or free-standing deck, pile depth Saskatchewan, code requirements deck Canada, what if I get stuck building a deck, best time of year to build a deck prairies, permit before digging deck.

DIY Deck Build Guide · Prairie-tested · Updated April 2026

How to build a deck. Step by step.

The actual prairie-tested process. Free drawings, takeoff, and answers — TUDS has your back from sketch through final inspection. Built from 100+ Saskatchewan deck projects, written by people who do this for a living, not by a content team in a New York high-rise.

13-step canonical sequenceFrost-depth + permit specificsSaskatchewan + Alberta + Manitoba
The 13-step canonical sequence

From sketch to final inspection.

Every step. In order. With the timing, the who-does-what, and the prairie-specific facts (frost depth, Sask 1st Call, ledger code) that the American DIY guides leave out.

  1. 1

    Decide deck size, shape, and height

    Sketch the footprint, decide attached vs. free-standing, and pick a height. Anything more than 600 mm (24 in) above grade triggers a guard requirement on the prairies. Go bigger than you think — undersizing is the most common regret in 100+ TUDS-priced projects.

    Who: YouTiming: 1 evening
  2. 2

    Get free drawings + takeoff from TUDS

    Send your sketch + dimensions to either yard. We do free CAD drawings and a full materials takeoff so you can pull a permit and price the job. The step DIY-ers skip and pay for later — wrong material counts mean three trips to the yard mid-build.

    Who: TUDS (free)Timing: 2–5 business days
  3. 3

    Pull the building permit

    Submit drawings to your municipality. Saskatoon and Regina both require permits for any deck attached to a house. Fees $100–$500. Processing 5–15 business days. Don't dig before the permit is issued — you'll have to tear out non-conforming work at your cost.

    Who: YouTiming: 1–3 weeks
  4. 4

    Locate utilities (Sask 1st Call)

    Call 1-866-828-4888 or submit at sask1stcall.com at least 3 business days before digging. Free service. Marks gas, electrical, telecom. Hitting a gas line while augering is a fatal mistake — never skip this even on a small project.

    Who: YouTiming: 3 business days
  5. 5

    Dig + pour piles (or set screw piles)

    Saskatchewan frost depth is 1.2 m / 4 ft. 6–10 piles for a typical 320 sq ft deck. Helical screw piles install in a day with no curing time — the easy choice if you're not pouring concrete elsewhere. Concrete sonotubes take 7–14 days to cure before framing.

    Who: You / contractorTiming: 1 day (screw) / 2 weekends (concrete)
  6. 6

    Set posts + ledger to house

    Highest-risk structural step on a DIY deck. Code requires through-bolts (not lag screws) on most Sask municipalities, plus proper flashing to prevent rot at the band joist. If this step makes you nervous, this is where TUDS Assisted DIY makes sense — we frame, you finish.

    Who: You (or TUDS Assisted DIY)Timing: 1 day
  7. 7

    Frame joists + beams

    Set beams on saddles, drop joists at 12 in or 16 in OC depending on board span tables. Crown each joist (bow up). Square the frame with the 3-4-5 method. This is where DIY decks succeed or fail. Trex Transcend, Eva-Last Apex PLUS, and Deckorators Voyage all require 12 in OC.

    Who: YouTiming: 1 weekend
  8. 8

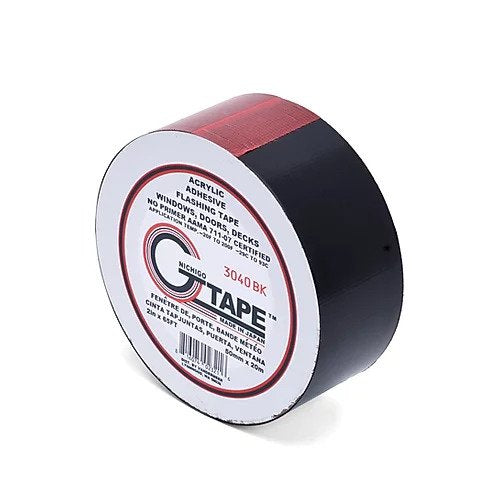
    Install joist tape (G-Tape!)

    Apply G-Tape to top of every joist, beam, and ledger before any board lands. Stops water sitting at the screw line, doubles framing lifespan, mandatory for several composite warranties. Single highest-ROI product on a Prairie deck — $1.20–$1.80 per linear ft of framing.

    Who: YouTiming: Half day
  9. 9

    Lay decking boards + fasten

    Composite: hidden clips at every joist (Camo Edge universal). Wood: face-screw with composite-coated screws (no steel, leaves streaks on cedar). Maintain manufacturer-spec side and end gaps. Cut and fasten one row at a time to avoid creep.

    Who: YouTiming: 1 weekend
  10. 10

    Build the railing system

    Aluminum (Regal Ideas, Fortress AL13 Home), composite, glass-panel, or cable. Posts through-bolted to rim with proper blocking. Code height: 36 in residential under 1.8 m above grade, 42 in above that. Spacing: 4 in max sphere.

    Who: YouTiming: 1 weekend
  11. 11

    Build stairs

    Cut stringers (rise 7 in, run 11 in is the rule). Treads 11 in min. Code requires graspable handrail on stairs over 3 risers. Composite stair-tread board has a manufactured nosing — buy tread board, not regular decking, for code-compliant nosing depth.

    Who: YouTiming: 1–2 days
  12. 12

    Apply finishing oil (wood decks only)

    Real wood (cedar, PT, Ipe) needs Cutek Extreme within 60 days of install. Composite needs nothing — don't oil it, it looks streaky. Cutek penetrates rather than films, won't peel. Re-coat every 12–24 months on the prairies.

    Who: YouTiming: Half day
  13. 13

    Final inspection + occupancy

    Schedule the final inspection with your municipality. Inspector checks footing depth, ledger flashing, joist hangers, railing height, and stair geometry. Once approved you get a stamped final — keep it for resale. Then crack a beer. You built a deck.

    Who: Municipal inspectorTiming: 1 day
The build, in five phases

Plan. Foundation. Frame. Surface. Finishing.

Every prairie deck build follows the same five-phase arc. The order is non-negotiable. The depth at each phase is where TUDS adds 100+ Saskatchewan projects of pattern-recognition that a generic Bob Vila guide can't.

Saskatchewan homeowner planning deck dimensions on graph paper at TUDS Saskatoon yard — Phase 1 of a DIY deck build covers drawings, materials takeoff, and building permit
Phase 1 Tier
Free with TUDS

Phase 1 — Plan + Permit

Drawings, materials takeoff, permit, and line-locates. The phase 80% of DIY-ers skip and 100% pay for later.

What happens here: sketch the deck, get CAD drawings + material takeoff (TUDS does this free), submit the permit application to your municipality, and call Sask 1st Call to mark underground utilities before you put a shovel in the ground. Common mistake: guessing material quantities and showing up at the yard for a third trip mid-project. Our takeoff prevents that. What to know: Saskatoon and Regina both require permits for any deck attached to a house. Permit fees are typically $100–$500. Permit processing 5–15 business days. Sask 1st Call: 1-866-828-4888 or sask1stcall.com — free service, mandatory minimum 3 business days before digging.

TUDS does
Drawings + takeoff (free)
You do
Permit application
Time
1–2 weeks
Cost
$100–$500 permit
Mandatory
Sask 1st Call locate
Skip risk
$$$ — re-do entire job
Helical screw piles installed below 1.2 metre prairie frost depth on a Regina backyard deck — Phase 2 of a DIY deck build covers footings, piles, and ledger preparation
Phase 2 Tier
Hardest step solo

Phase 2 — Foundation

Pile or footing setup. Saskatchewan frost depth is 1.2 m / 4 ft — twice what BC or southern Ontario requires.

What happens here: dig 6–10 holes to below frost depth (1.2 m on the prairies), pour concrete sonotube piles or set helical screw piles, attach the ledger to the house with through-bolts and flashing. Common mistakes: piles too shallow (heave the deck out of level after the first freeze), ledger lag-screwed instead of through-bolted (code violation in most Sask municipalities), or no flashing behind the ledger (rot at the band joist within 5 years). This is where TUDS Assisted DIY makes sense: if framing nervousness is the reason you're not building solo, our crew can set the foundation + frame and you take it from there.

TUDS does
Pile spec on drawings
You do
Dig + pour OR screw piles
Time
1–2 weekends
Cost
$150–$400 per pile
Frost depth
1.2 m / 4 ft (Sask)
Assist option
TUDS Assisted DIY
Pressure-treated deck framing with joists at 12-inch on-centre spacing and G-Tape applied to joist tops — Phase 3 of a DIY deck build covers beam, joist, and ledger framing
Phase 3 Tier
Where decks live or die

Phase 3 — Frame

Beams, joists, joist tape. Get the frame right and the rest is just stacking boards.

What happens here: drop beams on saddles, run joists at 12 or 16 in OC depending on the span tables for your decking brand, square the frame using the 3-4-5 method, then apply joist tape (we sell G-Tape — single highest-ROI product on a Prairie deck) to every top edge before any board lands. Common mistakes: joists 16 in OC under composite that requires 12 (creates board sag), no joist tape (rots the frame from the screw line out), or skipping the crown check (every joist has a bow — install bow-up). What to know: Trex Transcend, Eva-Last Apex PLUS, and Deckorators Voyage all require 12 in OC for residential applications. Don't guess — check the install guide.

Joist spacing
12 or 16 in OC
You do
Frame, square, tape
Time
1–2 weekends
Mandatory
Joist tape
Square check
3-4-5 method
Crown
Bow up, every joist
Composite deck boards installed with hidden Camo edge clips on a Saskatoon backyard deck — Phase 4 of a DIY deck build covers laying decking and fastening systems
Phase 4 Tier
The fun part

Phase 4 — Surface

Decking boards + hidden fasteners. The phase that actually feels like building a deck.

What happens here: lay boards starting at the house, fasten with hidden clips (composite) or face-screws (wood), maintain side-to-side and end-to-end gaps per manufacturer spec, cut + fasten one row at a time to avoid creep. Common mistakes: ignoring expansion gaps on a hot install day (boards buckle in summer), using wrong fastener (steel screws on cedar will leave black streaks within a season), or running long boards across the entire deck without staggering (looks DIY, not pro). What to know: hidden clips (Camo Edge universal, Trex Hideaway brand-specific) cost $0.50–$0.90 per board for grooved composite. Worth it for the clean look. Composite or wood? See Composite vs PVC and Composite Decking hub.

Composite
Hidden clips
Wood
Composite-coated screws
Time
1 weekend
Side gap
3–6 mm typical
End gap
5 mm hot-day install
Stagger
Random pattern, no joints align
Completed Saskatchewan composite deck with aluminum railing, stairs to grade, and post-cap LED lighting — Phase 5 of a DIY deck build covers railing, stairs, lighting, and final finish
Phase 5 Tier
Final inspection

Phase 5 — Finishing

Railing, stairs, lighting, finishing oils. Final inspection. Crack a beer.

What happens here: install the railing (aluminum, glass, composite, or cable), build stairs to grade, run low-voltage LED lighting if you want it, and oil any real-wood components with Cutek Extreme within 60 days. Then schedule the final inspection. Common mistakes: railing under code height (36 in residential under 1.8 m, 42 in above), stair rise/run mismatch (7 + 11 is the rule), no graspable handrail on stairs over 3 risers (instant inspection fail), or oil-finishing a composite deck (it doesn't need it and will look streaky). What to know: aluminum railing systems (Regal Ideas, Fortress AL13 Home) are the prairie default — paint-matched, won't rust, faster to install than wood.

Railing height
36 in / 42 in (over 1.8 m)
Stair rule
Rise 7, run 11
Time
1 weekend
Wood finish
Cutek within 60 days
Composite
No oil needed
Final step
Municipal inspection
2-minute DIY-readiness quiz

What's your DIY readiness?

Five questions. Honest recommendation: Full DIY, Assisted DIY (we frame, you finish), or Managed Install. No email required.

Question 1 of 5
0% complete

How much framing experience do you have?

If you walked into TUDS asking about DIY

Three questions every first-timer asks — and what we'd actually answer.

"Honest take — can a first-timer actually build a deck?"
Shane · Co-owner
Shane · Co-owner

Yes — but with the right scope. A small ground-level deck (under 200 sq ft, no stairs, no attachment to the house) is a realistic first project for someone who's done basic carpentry. A 400 sq ft attached deck with stairs and code-compliant railing is not — too many high-risk structural decisions for a first-timer to make blind. The honest middle path is TUDS Assisted DIY: we set the foundation and frame to code, you take it through to inspection. You still own the build, you save 40–55% vs. a managed install, and you don't bet your house on your first ledger attachment.

TUDS Assisted DIY
"What's the one thing I'm going to mess up?"
Wade · Co-owner
Wade · Co-owner

Joist spacing. We watch first-time builders frame at 16 in OC because the lumber-yard guy said that's standard, then six months later their composite boards sag because Trex Transcend, Eva-Last Apex PLUS, and Deckorators Voyage all require 12 in OC for residential applications. Always check the install guide for the specific board you bought. Second-most-common: skipping joist tape. Costs $200–$400 on a typical deck, doubles the framing lifespan, and is mandatory for several composite warranties. Third: ledger attachment with lag screws instead of through-bolts.

G-Tape joist tape
"How much can I really save vs. hiring a contractor?"
Shane · Co-owner
Shane · Co-owner

Labour is roughly 40–60% of installed cost on most prairie residential decks. A 320 sq ft mid-tier composite deck is $19,000–$38,000 installed in Saskatchewan; the same project DIY-ed is $11,000–$22,000 in materials. So realistic savings: $10,000–$25,000. But factor in tool rentals (auger, mitre saw, trailer — $300–$800), 10% extra material for waste, and the time cost of getting it right. Assisted DIY splits the difference — typically 40–55% savings without doing the structural work yourself. See our full Deck Cost Canada guide for the breakdown.

Deck cost guide
DIY vs. Assisted vs. Managed vs. random contractor

Four ways to build the deck. One that fits.

Scope: A typical 320 sq ft (16x20 ft) Saskatchewan backyard deck in mid-tier composite. Cost ranges from our Deck Cost Canada guide. TUDS Full DIY and Assisted DIY are real services with real pricing — call either yard for a project-specific quote.

Build path TUDS Full DIYTUDS Assisted DIYTUDS Managed InstallRandom contractor
Cost (320 sq ft mid-tier composite) $11k–$22k$15k–$28k$22k–$38k$22k–$50k
Time commitment (you) 60–120 hr30–60 hr5–10 hr5–10 hr
Code-compliance burden On youSharedOn usOn contractor
Free drawings + takeoff YesYesYesMaybe
Phone-a-friend support Yes — TUDSYes — TUDSYes — TUDSTheir crew only
Warranty support Vendor + TUDSVendor + TUDSVendor + TUDS + crewContractor only
Money saved vs. random contractor $10k–$28k$7k–$22k$0–$12kBaseline
Best for Confident framerWants help on structureTime-poor / hands-offAlready has a guy
Read: How much does a deck cost in Canada?
Material cost calculator

Plug in your sq ft, see material cost ranges.

Width × length for rectangles, or total square feet for any shape. Calculator multiplies sq ft by each material's installed-cost range — DIY material spend lands at roughly 40–55% of these numbers since labour is removed.

100 ft² 1,000 ft² 2,000 ft²
Area priced
320sq ft

Estimates exclude railing, stairs, lighting, permits, and tool rentals. For a real Saskatchewan-specific number on your DIY project, send your dimensions to TUDS for a free build-sequence-ordered materials takeoff.

Pressure-treated
Entry
approximate · boards only
Cedar
Mid
approximate · boards only
Capped PVC
Premium
approximate · boards only
Tools + materials checklist

The four DIY essentials most homeowners forget.

Joist tape, hidden fasteners, end-cut paint, deck cleaner. Budget $300–$800 across these four lines on a typical 320 sq ft project — they're the difference between a deck that lasts 25 years and one that doesn't.

Cinta para vigas G-Tape 3040BKJoist tape

G-Tape

Self-adhesive joist tape — single highest-ROI material on a Prairie deck. Doubles framing lifespan.

$29.79 starting
Clips de borde de camuflaje.Hidden fastener

Camo Edge Clips

Universal hidden-clip system for grooved composite + PVC. $0.50–$0.90 per board.

$54.19 starting
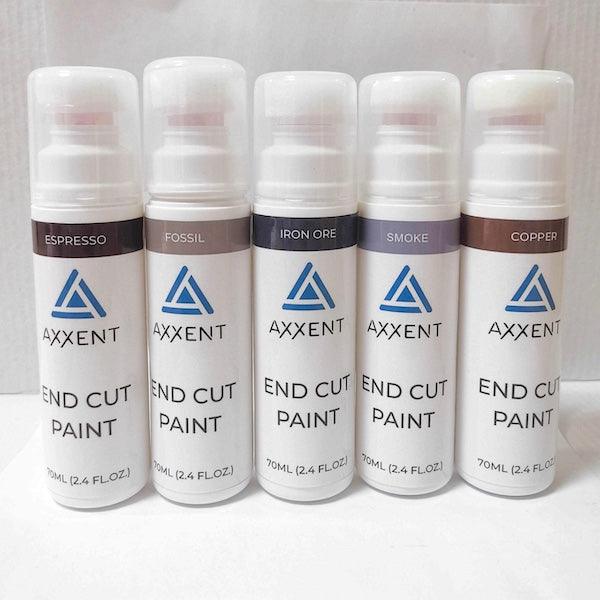
Pintura para corte final AxxentBoard-end finish

Axxent End-Cut Paint

Seals the cut ends of composite boards so the lighter core doesn't show. Eight colour shades — match to your tier colour.

$24.99
TUDS SUDS Deck CleanerCleaner

TUDS SUDS Deck Cleaner

Our house-brand cleaner, formulated for composite + wood decks. Non-caustic, non-butyl, eco-friendly.

$29.99
Official resources

Straight from the manufacturer. Everything technical.

Video

Composite deck installation walkthrough

Install
Video

Eva-Last Apex PLUS — installation overview

Install
Video

Composite collection walkthrough — material decisions

Material
FAQ — DIY deck build, answered

The 10 questions Canadian DIY-ers ask before they pour the first pile.

Don't see yours? Call either showroom — Saskatoon (306-249-3325) or Regina (306-522-3325). We've talked first-timers through ledger attachment more times than we can count.

For a confident DIY builder on a 320 sq ft attached deck: 60–120 hours of build time, spread over 2–4 weekends for the on-site work, plus 1–3 weeks of permit lead-time and 7–14 days of pile cure (if pouring concrete — helical screw piles install same-day). First-timers should budget 40% more time. The split: planning + permit (10 hr), foundation (15–25 hr), framing (15–25 hr), decking (10–20 hr), railing + stairs (10–15 hr), finishing + inspection (5 hr).

Must-own: circular saw, drill + impact driver, 4 ft level, tape measure, framing square, chalk line, post-hole shovel or auger, and a hammer. Must-rent or borrow: mitre saw (a circular saw works but a mitre is 5x faster on cuts), torpedo level, gas-powered auger if pouring concrete piles, and a string line. Composite-specific: a Camo or hidden-fastener installation tool (some are free with bulk clip purchase at TUDS). Don't forget: safety glasses, knee pads, and a tool belt — a long install day on a deck is brutal without them.

Three steps trip up first-timers: (1) Ledger attachment — code requires through-bolts and proper flashing; getting it wrong rots the band joist and voids the structural integrity within 5 years. (2) Squaring the frame — if your initial layout is 1° off, every board cut compounds the error. Use the 3-4-5 method religiously. (3) Joist crowning — every joist has a bow; install bow-up so it flattens under load instead of sagging. Honest answer: if any of those three steps make you nervous, look at TUDS Assisted DIY. We set the structural part, you finish the deck.

Both are allowed. Ledger-attached is cheaper (no extra row of piles and posts) but adds the highest-risk structural step on a DIY deck. Free-standing doubles the post count and material cost but eliminates the band-joist rot risk and is much simpler to permit. Sask municipalities require through-bolts (not lag screws) into solid framing for any ledger attachment, plus ledger flashing to prevent water from sitting on the band joist. If your house has stucco, brick, or stone exterior, a free-standing deck is often the realistic answer — drilling through structural finishes is a non-DIY job.

Saskatchewan, Alberta, and Manitoba: 1.2 metres (4 ft) minimum below grade. That's twice the depth required in coastal BC or southern Ontario. Some northern Sask municipalities require 1.5 m. Concrete sonotube piles need to extend below frost line and bell out at the base for bearing. Helical screw piles are increasingly popular in our climate because they install in a day, no curing, and the pile installer can certify depth on the spot for the inspector. Each pile costs $150–$400 installed in Saskatchewan; a 320 sq ft deck typically needs 6–10.

Labour is 40–60% of installed cost on most Prairie residential decks. Realistic DIY savings on a 320 sq ft mid-tier composite deck: $10,000–$25,000 vs. a managed install. Factor in $300–$800 in tool rentals + 10% extra material for waste + the time cost. TUDS Assisted DIY typically saves $7k–$22k vs. fully-managed without doing the structural work yourself. See Deck Cost Canada for the full breakdown.

Saskatchewan residential decks (under National Building Code Part 9): (1) Footings below 1.2 m frost depth. (2) Ledger through-bolted with flashing. (3) Joist spacing per span tables (12–24 in OC depending on board + span). (4) Guard / railing height 36 in residential under 1.8 m above grade, 42 in above. (5) Guard spacing 4 in max sphere passage. (6) Stair geometry rise 5–7-7/8 in, run 8.25 in min. (7) Graspable handrail on stairs over 3 risers. (8) Lighting required at exterior stairs in some municipalities. Always confirm with your local building department.

Phone TUDS. We answer the phone in Saskatoon (306-249-3325) and Regina (306-522-3325) Mon–Fri 7am–5pm and Sat 9am–3pm. We've talked customers through ledger attachment, joist span confusion, and railing post anchoring more times than we can count. If the issue is structural — say, you've framed something you don't trust — we can dispatch a TUDS Assisted DIY crew to inspect, correct, and hand it back. The point is: you're not alone. The whole reason TUDS exists is so prairie homeowners can DIY without betting the project on a YouTube video from Florida.

The prairie deck-build window is April through September. May and June are ideal — frost is out of the ground (so piles can go in), temperatures are 10–20°C (so composite isn't expanded to its hot-day length), and you have long evenings for after-work progress. July–August work but composite boards are at peak expansion — install with full hot-day end-gap (5 mm) to avoid winter shrink-pull. September is the closing window — get inspection scheduled before frost. October–March: not realistic for foundation work. Plan it now, dig in spring.

Always before. Saskatoon and Regina both require the permit to be issued before any ground is broken — digging without one can result in stop-work orders, fines, and forced removal of non-conforming work. The legal sequence is: drawings → permit application → wait for issuance (5–15 business days) → call Sask 1st Call (3 business days minimum) → dig. The biggest DIY mistake we see is homeowners who pour piles, then submit drawings, and have to re-dig because the inspector ruled the pile depth or spacing non-conforming.

From TUDS

DIY content. Built from real prairie projects.

Build walkthroughs, product comparisons, and prairie-specific code clarifications — fresh weekly on the YouTube channel and Deckheads podcast.

Latest from TUDS · YouTube

Watch the latest from TUDS

Unboxings, install walkthroughs, brand comparisons. New video most weeks — the player above always shows our latest.

Subscribe on YouTube →
The TUDS Podcast

The Deckheads

Honest talk about real projects, real mistakes, and Prairie deck-building. Long-form, for homeowners and pros alike.

Follow along — daily builds, honest takes.
Why TUDS

The deck shop prairie DIY-ers actually call.

Real Google reviews from real Saskatoon and Regina DIY-ers and contractors — guidance is on the table from day one.

2016
Canadian-owned since
2
Stores — Regina & Saskatoon
90+
Authorized brands
10,000+
Customers helped
4.9
TUDS Google rating
★★★★★
GGoogle

“We recently gave our 20 year old wood deck a makeover with the help of The Ultimate Deck Shop. Justin at the Regina location was incredibly helpful with each of my visits, answering my questions and explaining/showing me things clearly. To refinish the top of the deck, we used Cutek Wood Reviver followed by Cutek Ex...”

Nicole N.
Regina · Jul 2025
★★★★★
GGoogle

“We had a great experience with The Ultimate Deck Shop. The fence we purchased is great quality. The service was amazing. The price was the best around. We would highly recommend to anyone and will definitely refer family and friends.”

Denise A.
Regina · Nov 2025
★★★★★
GGoogle

“Amazing service (Sam was super helpful and patient). Beautiful options, all staff were friendly. Highly recommend.”

Nikki H.
Regina · Jul 2025
Plan it in person

Saskatoon, Regina, and across the prairies.

Two full yards. Bring your sketch. Walk out with drawings, a takeoff, and a build-sequence plan in your pocket.

Store

Regina

141 4th Avenue East, Regina SK

Walk in with your sketch. Our Escape Artists will draw it up, take off the materials, and have you permit-ready before you leave.

Mon–Fri 7am–5pm · Sat 9am–3pm

Store

Saskatoon

320 68th Street East, Saskatoon SK

DIY package, Assisted DIY consult, or managed-install referral — all in one stop. Bring your dimensions and a coffee.

Mon–Fri 7am–5pm · Sat 9am–3pm

Service area · DIY package + Assisted DIY
SaskatoonReginaMoose JawPrince AlbertYorktonLumsdenWarmanMartensvilleSwift CurrentNorth BattlefordWeyburnEstevanHumboldtMelvilleRosthernTisdaleCalgaryEdmontonWinnipeg+ Most of SK, AB, MB
We support DIY deck builders across Saskatchewan, Alberta, and Manitoba. Free drawings + takeoff regardless of where the project lands.
Get the package, build the deck

You've read the playbook. Now get the materials.

Send us your dimensions and we'll come back with free CAD drawings, a build-sequence-ordered materials takeoff, and a permit-ready package. No pressure, no obligation. Or come walk the boards in Saskatoon or Regina — one of our Escape Artists will sketch it with you on the spot.